Mechanism Setup
Mechanism Setup - Verifying Hardware Configuration
Before implementing advanced control algorithms, we need to verify that motors and encoders are working correctly. This ensures proper direction, zeroing, and basic functionality.
Always verify hardware setup before adding control algorithms. Otherwise you will be debugging control issues when the problem is hardware configuration.
Warning: Stop Code Before Hardware Setup
Before performing hardware setup tasks, stop any running code and turn ONthe "CANivore USB" setting in TunerX. This ensures proper communication with physical hardware during testing and configuration.
Steps:Stop any running robot code → Open TunerX → Go to CANivore settings → Enable "CANivore USB"
Setup Steps by Mechanism
📝 Important Note: Encoder Replacement
1️⃣ Encoder Direction
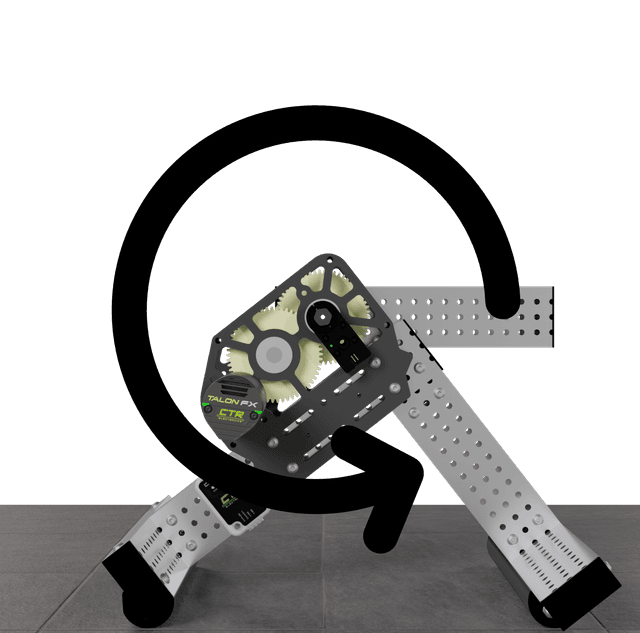
You'll need to make sure your encoder is configured correctly. With the device facing you, as shown in the following picture, please make sure that the encoder position increases as you rotate the arm counterclockwise.
Expected Behavior:
- • Counterclockwise rotation → Position increases
- • Clockwise rotation → Position decreases
🔧 Implementation Sequence
Rotate Counter-Clockwise
Manually rotate the mechanism counter-clockwise and observe if the encoder position increases.
Fix Direction if Needed
If position goes down instead of up, go to "Info" → "Sensor Direction" → press "Apply" button to invert the encoder direction.
Zero the Encoder
Put arm to zero position, then in TunerX go to "Info" → press "0 encoder" button → press "Apply" button.
2️⃣ Verifying Motor Setup
You'll want to make sure your motor is spinning in the expected direction. If the motor is getting positive voltage, it should be spinning counterclockwise. You can check this through tuner, with the device facing you as in the following picture.
🔧 Motor Direction Verification
Positive Voltage Test
Apply +6V to your motor and observe movement direction.
Expected:Positive voltage should move the mechanism in the "positive" direction (counter-clockwise for arms).
Encoder Consistency
Verify encoder readings match motor movement.
Expected: Positive motor voltage → positive encoder change, negative motor voltage → negative encoder change.
✅ Ready for Control
Once your mechanism moves in the correct direction and provides accurate feedback (encoder for arms, motor consistency for flywheels), you're ready to implement advanced control algorithms.
💡 Next Step: With verified hardware setup, we can now implement PID control for precise mechanism control. The control algorithm will use sensor feedback to automatically reach target positions or velocities.